As we continue our series on ItemsControl, it probably makes sense to take a small detour and look at WPF controls in general. In this post, we will examine how WPF controls get their visual representation through styles and templates. Then we will look at how these techniques specifically apply to several ItemsControl classes.
This article is fairly long and covers a lot of really important information, including the following:
It is definitely worth taking your time to understand these concepts. Feel free to break the article up into more manageable pieces if you are time-constrained.
 I would also encourage you to keep kaxaml up and running as you learn about styles and templates. I think you’ll find that it makes the content more meaningful when you directly interact with the samples. As such, this article contains a lot of kaxamples, which is my term for kaxaml-ready samples. When you see the kaxaml symbol, you know you can cut and paste the included markup snippet directly into kaxaml to interact with it live. Then you are free to tweak the markup and make a few cool new styles and templates of your own!
The Lookless Control Model
When developers first start learning WPF, they are often very surprised to learn that a WPF control does not include a hardcoded visual representation. Rather, the default visual representation is specified in XAML in a completely separate theme assembly from the class that implements the control’s logic. This separation of code-based logic from visual representation (the control’s look and feel) is what makes the WPF control model so powerful. We refer to this approach as a “lookless control model”.
Why, you may be asking, is such a model better than the traditional approach of defining the visuals as part of the control? I’ll give you two big reasons: design and reusability.
If you’ve studied WPF or Silverlight much, you have certainly heard about the new developer/designer workflow that these technologies enable. Namely, developers and designers can work side by side to simultaneously create powerful and visually stunning applications, with each person doing what they do best. A developer can implement an application’s logic at the same time that a designer creates the application’s look and feel. To a great degree, it is the lookless control model that enables this new workflow.
It turns out that left-brained developers don’t always come up with the most eye-pleasing visual designs, as can be seen by looking at the “battleship gray” user interfaces coming out of the Windows Forms world for the past decade. Now contrast these apps with the vibrant Flash-based web applications created in the same timeframe. The big difference is that most of the cool Flash applications were created by right-brained designers who take aesthetics very seriously. (Yes, I’m stereotyping with the whole left-brained/right-brained thing… some stereotypes are just true.)
By introducing a lookless control model where the visual representation of the control is specified apart from the control’s code, we are able to put the visual design into the hands of a qualified UX designer, where it belongs.
The second big reason for separating a control’s visuals from its code implementation is reusability. In the past, if you wanted to have two buttons with different visual appearances, you had to create two separate button classes with the correct rendering code baked into each class. Both classes contained the same basic button logic. They both provided a “click” event in response to the appropriate mouse or keyboard user interactions. The only difference between the button classes was in the rendering logic.
By moving the visual representation into XAML and out of the control class, we allow a single Button class to be reused wherever we need to support a Click interaction. The button can have whatever visual representation the designer wants to create. The developer no longer needs to be involved in the process of redefining a button’s visual representation.
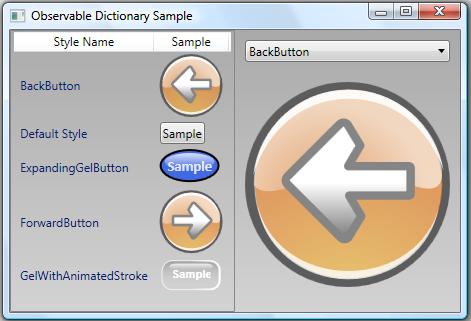
An example of this reusability can be seen in the following image (borrowed from my Observable Dictionary Sample) depicting a ListView in which each row contains a style name and a button. The only difference between each button is the “Style” used to define the button’s look and feel.
Introduction to Styles
We have already seen an example of how one might style and template an item container via the ItemContainerStyle property (see ‘I’ is for Item Container). Now it’s time to actually dig into the nitty gritty details of control styling and templating. If you are already familiar with styling and templating, you can skip ahead to the section entitled Templating an Items Control. (Of course, you might consider continuing on through the following sections as a refresher course and it’s possible you might even learn something new. :P)
A WPF style consists of a collection of property values that are applied to a framework element either explicitly (by setting its Style property) or implicitly (based on a resource lookup using the element’s default style key). These property values are applied using Setter objects. Thus, a style can be thought of as a collection of Setter objects. Here is a very simple example:
<Style TargetType="{x:Type Rectangle}">
  <Setter Property="Width" Value="50" />
  <Setter Property="Height" Value="50" />
</Style>
In this case, a style is created for a Rectangle. There are two setters in the style. These set the Width and Height properties of the Rectangle to 50.
So how do you actually use the style? Typically, you will give it a resource key and add it to a resource dictionary somewhere in your element hierarchy. Then you can use the resource key to apply the style to specific elements in the subtree. Here is a kaxample:
<Grid xmlns="http://schemas.microsoft.com/winfx/2006/xaml/presentation"
xmlns:x="http://schemas.microsoft.com/winfx/2006/xaml">
<Grid.Resources>
<Style x:Key="MyRectangleStyle"
TargetType="{x:Type Rectangle}">
<Setter Property="Width" Value="50" />
<Setter Property="Height" Value="50" />
</Style>
</Grid.Resources>
<StackPanel Orientation="Horizontal">
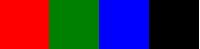
<Rectangle Style="{StaticResource MyRectangleStyle}" Fill="Red" />
<Rectangle Style="{StaticResource MyRectangleStyle}" Fill="Green" />
<Rectangle Style="{StaticResource MyRectangleStyle}" Fill="Blue" />
<Rectangle Style="{StaticResource MyRectangleStyle}" Fill="Black" />
</StackPanel>
</Grid>
In the above example, the style is explicitly applied to each Rectangle because we have set the Style property on the Rectangle elements. If we want the style to be applied implicitly to every Rectangle in the subtree, we can simply remove the x:Key attribute from the style declaration and then not specify the Style property on the Rectangle elements, as shown in this kaxample:
<Grid xmlns="http://schemas.microsoft.com/winfx/2006/xaml/presentation"
      xmlns:x="http://schemas.microsoft.com/winfx/2006/xaml">
  <Grid.Resources>
    <Style TargetType="{x:Type Rectangle}">
      <Setter Property="Width" Value="50" />
      <Setter Property="Height" Value="50" />
    </Style>
  </Grid.Resources>
  <StackPanel Orientation="Horizontal">
    <Rectangle Fill="Red" />
    <Rectangle Fill="Green" />
    <Rectangle Fill="Blue" />
    <Rectangle Fill="Black" />
  </StackPanel>
</Grid>
You may be curious as to why the above style is applied to all Rectangle elements in the subtree. The answer is hidden in the framework’s parsing routine for resource dictionaries. Each element added to a resource dictionary must have a key. It is noteworthy that the style above is conspicuously missing an x:Key attribute. It turns out that the XAML parser has special handling for Style objects that are added to a resource dictionary. If no key is specified, the parser uses the style’s TargetType as its key. So the above style declaration is actually equivalent to the following:
<Style x:Key="{x:Type Rectangle}" TargetType="{x:Type Rectangle}">
  <Setter Property="Width" Value="50" />
  <Setter Property="Height" Value="50" />
</Style>
There is a convention in WPF that an element’s type is used as its default style key. As mentioned earlier, if the Style property is not explicitly set on a framework element, a resource lookup takes place using this default style key (the element type) to find an appropriate style. Hence, in the example above, our style is applied to each Rectangle as a result of its default style key.
Now let’s take a look at a styling feature that even some of the most experienced designers may not know about…
Our style above can only be applied to Rectangle elements. What if we want to create a more generic style that can be applied to any framework element? It’s actually possible to create such a generic style by simply not setting the TargetType property. Of course, this creates some ambiguity for the framework because without knowing the object type, WPF doesn’t necessarily know how to interpret the Property member of a Setter. To remove this ambiguity, we must specify the object type in each setter, as shown here:
<Style x:Key="SharedStyle">
  <Setter Property="FrameworkElement.Width" Value="50" />
  <Setter Property="FrameworkElement.Height" Value="50" />
  <Setter Property="Button.IsDefault" Value="True" />
</Style>
Now the style can be applied to elements of differing types. In fact, generic styles actually give us the ability to set properties that are not shared by all of the elements to which the styles are applied. For example, the style above can be applied to both a Rectangle and a Button even though the style contains a Setter for the Button.IsDefault property, as shown in this kaxample:
<Grid xmlns="http://schemas.microsoft.com/winfx/2006/xaml/presentation"
xmlns:x="http://schemas.microsoft.com/winfx/2006/xaml">
<Grid.Resources>
<Style x:Key="SharedStyle">
<Setter Property="FrameworkElement.Width" Value="50" />
<Setter Property="FrameworkElement.Height" Value="50" />
<Setter Property="Button.IsDefault" Value="True" />
</Style>
</Grid.Resources>
<StackPanel Orientation="Horizontal">
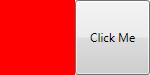
<Rectangle Style="{StaticResource SharedStyle}" Fill="Red" />
<Button Style="{StaticResource SharedStyle}">Click Me</Button>
</StackPanel>
</Grid>
There is a lot more that could be covered in this section on element styling (including things like “based on” styles, overriding style properties, declaring styles at the application and theme levels, etc), but this is an introductory look so let’s move on now to control templates…
Introduction to Control Templates
We first introduced the concept of templates in ‘D’ is for DataTemplate. At that time, we learned that a template is just a tree of visual elements (along with some resources and triggers) used to define the look and feel of a member of the logical tree. As it builds the logical tree, the framework watches for controls and data items that have corresponding templates. When such an element is encountered, the appropriate template is “inflated” into the actual visuals that represent the logical item and those visuals are inserted into the visual tree.
We’ve already learned that a DataTemplate is used to declare the visual representation of a data item that appears within an application’s logical tree. In ‘P’ is for Panel, we learned that an ItemsPanelTemplate is used to declare the items host used within an ItemsControl. (Note that an ItemsPanelTemplate is a special template whose visual tree must consist of only a single Panel element.) In this section, we will look at a third type of template… a ControlTemplate.
As the name implies, a ControlTemplate is used to declare the visual representation for a control. All native WPF controls have default control templates for each Windows theme. These templates give controls their default visual appearance.
It should come as no surprise that the visual representation of a control like a Button is composed of several other WPF elements, including a ContentPresenter and an element to render the outer and inner lines that give the Button a 3-dimensional appearance. These subelements which make up the control’s appearance are part of its ControlTemplate.
The nice thing about the lookless control model is that we have full control over the visual appearance of all WPF controls. We can either accept a control’s default appearance or we can change the control’s appearance by defining our own ControlTemplate. Below is an example of a ControlTemplate for a ListBox:
<ControlTemplate x:Key="MyListBoxTemplate" TargetType="{x:Type ListBox}">
  <Border Background="White" BorderBrush="Black"
      BorderThickness="1" CornerRadius="6">
    <ScrollViewer Margin="4">
      <ItemsPresenter />
    </ScrollViewer>
  </Border>
</ControlTemplate>
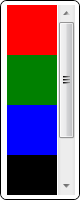
This template defines a visual tree for the ListBox that consists of a Border, a ScrollViewer, and an ItemsPresenter. The logic behind the ListBox is still defined within the ListBox class, but the appearance is defined by us.
Note that similar to a style, the ControlTemplate class exposes a TargetType property. This property must always be set. If you ever notice your template is not being applied as expected, be sure to verify that the TargetType matches the control type.
Now to apply our custom template to a ListBox, we simply set the Template property on the ListBox, as shown here:
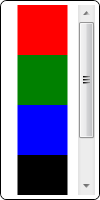
<ListBox Width="80" Height="200"
    Template="{StaticResource MyListBoxTemplate}">
  <Rectangle Width="50" Height="50" Fill="Red" />
  <Rectangle Width="50" Height="50" Fill="Green" />
  <Rectangle Width="50" Height="50" Fill="Blue" />
  <Rectangle Width="50" Height="50" Fill="Black" />
</ListBox>
|
 |
Setting the Template in a Style
In the previous example, we assigned a ControlTemplate to a ListBox by setting the Template property directly on the ListBox. This is not the most common scenario, though. Styles and templates were designed to go hand-in-hand. As such, templates are very often included as part of a style.
Remember that a style consists of a collection of Setter objects. For a control style, one of these Setter objects usually sets the Template property on the control, as shown in the following ListBox style:
<Style TargetType="{x:Type ListBox}">
  <Setter Property="Background" Value="LightGray" />
  <Setter Property="BorderThickness" Value="2" />
  <Setter Property="HorizontalContentAlignment" Value="Center" />
  <Setter Property="Padding" Value="5" />
  <Setter Property="Template">
    <Setter.Value>
      <ControlTemplate TargetType="{x:Type ListBox}">
        <Border Background="White" BorderBrush="Black"
            BorderThickness="1" CornerRadius="6">
          <ScrollViewer Margin="4">
            <ItemsPresenter />
          </ScrollViewer>
        </Border>
      </ControlTemplate>
    </Setter.Value>
  </Setter>
</Style>
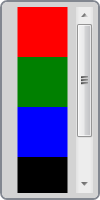
Suppose we add the above style to our application’s resources. Note that this style is using the exact same control template as we presented earlier. And since we’ve only set the TargetType on this style, all ListBox elements in our application will implicitly use our control template. So now we can add the following ListBox to our UI:
<ListBox Width="100" Height="200">
  <Rectangle Width="50" Height="50" Fill="Red" />
  <Rectangle Width="50" Height="50" Fill="Green" />
  <Rectangle Width="50" Height="50" Fill="Blue" />
  <Rectangle Width="50" Height="50" Fill="Black" />
</ListBox>
|
 |
That looks pretty good, don’t you think? Well, upon closer inspection of our style, you might notice that a few things are not quite right. (Hint: Look at the first few Setter objects in the style.)
Clearly, we want our template and style to play nicely together. If we use a Setter in the style to set a property, we want the template to leverage that property. The problem in our example is that several property values (Background, BorderBrush, BorderThickness, Margin, etc) are hard coded on elements in our template. Other properties of the control are simply not bound to anything in the template. This clearly isn’t what we want. To fix these issues, we need to use something called a TemplateBinding within the template.
A TemplateBinding is a lightweight binding object used to link the value of a property on an element in the control template to the value of a property on the actual control that is being templated. In our ListBox example, we can add a few such bindings, as shown below, to achieve the desired result:
<Style TargetType="{x:Type ListBox}">
  <Setter Property="Background" Value="LightGray" />
  <Setter Property="BorderThickness" Value="2" />
  <Setter Property="HorizontalContentAlignment" Value="Center" />
  <Setter Property="Padding" Value="5" />
  <Setter Property="Template">
    <Setter.Value>
      <ControlTemplate TargetType="{x:Type ListBox}">
        <Border Background="{TemplateBinding Background}"
            BorderBrush="{TemplateBinding BorderBrush}"
            BorderThickness="{TemplateBinding BorderThickness}"
            CornerRadius="6">
          <ScrollViewer Margin="{TemplateBinding Padding}">
            <ItemsPresenter />
          </ScrollViewer>
        </Border>
      </ControlTemplate>
    </Setter.Value>
  </Setter>
</Style>
|
 |
Now all of the properties being set within the style are connected to elements within the template. Thus, those properties are truly reflected in the control’s visual representation.
Introduction to Triggers
So far we’ve seen how to provide the look for a lookless control. Now let’s peek at the other half of the user experience… the feel. A control gets its look from the visuals. It gets its feel from how those visuals respond to state changes or user interactions. This is where triggers come into play.
A trigger is a collection of Setter objects (or animation actions) that get applied only when a given condition is true. WPF contains three main types of triggers: Trigger (also referred to as a property trigger), DataTrigger, and EventTrigger. It’s also possible to respond to multiple simultaneous conditions by using the related MultiTrigger and MultiDataTrigger objects.
There is a Triggers collection within each of the Style, ControlTemplate, and DataTemplate classes. This means that triggers can be used in both styles and templates, by adding them to the appropriate Triggers collection. (There is also a Triggers collection on FrameworkElement, but it can only contain event triggers… not property or data triggers.)
Let’s take a look at a very simple example. Here is a style for a Button:
<Style TargetType="{x:Type Button}">
  <Style.Triggers>
    <Trigger Property="IsMouseOver" Value="True">
      <Setter Property="Opacity" Value="0.7" />
      <Setter Property="TextBlock.FontWeight" Value="Bold" />
    </Trigger>
  </Style.Triggers>
</Style>
As you might expect, moving the mouse over a Button that is using this style causes the opacity of the Button to change to 0.7. It also changes the inherited FontWeight value for any contained TextBlock elements to Bold.
As the example above illustrates, triggers are fairly intuitive. You can pretty much understand how they work just by reading the markup. As such, we won’t spend too much time explaining their usage. Instead, we will just look at some tips and tricks for leveraging triggers in different scenarios.
A data trigger allows you to trigger off of a property on your data item by leveraging a Binding. This is most often used in the context of a DataTemplate, but don’t overlook the power of data triggers in other scenarios. For example, a data trigger is very handy for triggering off of a property on another object, as shown in this example:
<DataTemplate x:Key="MyItemTemplate">
  <Border x:Name="root" BorderThickness="2" CornerRadius="6">
    <TextBlock Margin="4" Text="{Binding XPath=@First}" />
  </Border>
  <DataTemplate.Triggers>
    <DataTrigger Value="True" Binding="{Binding Path=IsSelected,
        RelativeSource={RelativeSource AncestorType={x:Type ListBoxItem}}}">
      <Setter TargetName="root" Property="BorderBrush" Value="Pink" />
    </DataTrigger>
  </DataTemplate.Triggers>
</DataTemplate>
In this case, we are creating a DataTrigger that acts more like a property trigger by using a FindAncestor binding to get to a source object. Namely, we are triggering off of the IsSelected property on an ancestor ListBoxItem. This will allow us to draw a pink border around our template whenever it is selected. Now suppose our data item is a person and we only want a pink border when decorating a female. If the person is male, we instead want a blue border. We could achieve this by adding a second trigger, as shown in the following template:
<DataTemplate x:Key="MyItemTemplate">
  <Border x:Name="root" BorderThickness="2" CornerRadius="6">
    <TextBlock Margin="4" Text="{Binding XPath=@First}" />
  </Border>
  <DataTemplate.Triggers>
    <DataTrigger Value="True" Binding="{Binding Path=IsSelected,
        RelativeSource={RelativeSource AncestorType={x:Type ListBoxItem}}}">
      <Setter TargetName="root" Property="BorderBrush" Value="Pink" />
    </DataTrigger>
    <MultiDataTrigger>
      <MultiDataTrigger.Conditions>
        <Condition Binding="{Binding XPath=@Gender}" Value="Male" />
        <Condition Value="True" Binding="{Binding Path=IsSelected,
            RelativeSource={RelativeSource AncestorType={x:Type ListBoxItem}}}" />
      </MultiDataTrigger.Conditions>
      <Setter TargetName="root" Property="BorderBrush" Value="Blue" />
    </MultiDataTrigger>
  </DataTemplate.Triggers>
</DataTemplate>
Now we have added a MultiDataTrigger with two conditions. The first contains a Binding to a property on the data item that identifies the gender of the person. The second is the same binding we used earlier to get at the IsSelected property on the ancestor ListBoxItem. Now if the person is male and they are selected, the border will be blue.
The above example illustrates another important aspect of triggers and setters… namely that the order of triggers and setters is important. When multiple triggers evaluate to true, all of their setters are applied. More specifically, they are applied sequentially in the order that the triggers appear within the Triggers collection and in the order that the setters appear within each trigger. Here’s a simple way to think about this… if multiple setters target the same property, the last setter wins!
The final thing I will point out about this example is that it demonstrates how to combine both property triggers and data triggers by leveraging a MultiDataTrigger. At times, this can come in very handy. People tend to forget that a DataTrigger can always be used as a property trigger simply by setting the source of the binding appropriately.
There is one more type of trigger called an EventTrigger. An event trigger, as the name implies, can be used to start an action in response to an event. More specifically, an event trigger executes in response to a routed event. Here’s a kaxample of a Button that uses an event trigger to begin an opacity animation when the Button is first loaded:
<Canvas xmlns="http://schemas.microsoft.com/winfx/2006/xaml/presentation"
        xmlns:x="http://schemas.microsoft.com/winfx/2006/xaml">
  <Button Opacity="0" Content="My Button">
    <Button.Triggers>
      <EventTrigger RoutedEvent="FrameworkElement.Loaded">
        <BeginStoryboard Name="MyBeginAction">
          <Storyboard>
            <DoubleAnimation Storyboard.TargetProperty="Opacity"
                Duration="0:0:1" BeginTime="0:0:0.25" To="1.0" />
          </Storyboard>
        </BeginStoryboard>
      </EventTrigger>
    </Button.Triggers>
  </Button>
</Canvas>
In this example, the event trigger is added directly to the Triggers collection of the framework element (the Button), itself. Again, the FrameworkElement.Triggers collection can only contain event triggers. If you wish to use property or data triggers, they must be within the Triggers collection of a style or template.
Note that you cannot trigger off of a standard CLR event because the mechanism for supporting event triggers depends on the WPF event routing engine, which intelligently routes events to only the elements that have registered to receive them.
With a property or data trigger, the condition that causes the trigger to be applied is based on state. As such, the condition will be true for a period of time. As long as the condition evaluates to true, the setters are applied to their target properties. When the condition later becomes false, the setters are no longer applied and the target properties fall back to their untriggered values.
There is no such concept of state with an event trigger. An event is fleeting. The event fires and then it’s gone. Since the condition that invokes an event trigger is instantaneous, an EventTrigger does not contain a collection of setters. Rather, it contains actions which execute in response to the event. These actions allow you to control (start, stop, pause, resume, etc) the execution of storyboards. The example above uses a BeginStoryboard action in response to the FrameworkElement.Loaded event.
You may also want to set properties based on the firing of an event. Even though you don’t have setters, you can still use an EventTrigger to set property values. You achieve this by leveraging an object animation with a DiscreteObjectKeyFrame, as shown in this kaxample:
<Grid xmlns="http://schemas.microsoft.com/winfx/2006/xaml/presentation"
xmlns:x="http://schemas.microsoft.com/winfx/2006/xaml"
xmlns:sys="clr-namespace:System;assembly=mscorlib">
<Grid.Triggers>
<EventTrigger RoutedEvent="CheckBox.Checked">
<EventTrigger.Actions>
<BeginStoryboard>
<Storyboard>
<ObjectAnimationUsingKeyFrames Storyboard.TargetName="tb"
Storyboard.TargetProperty="Text" Duration="0:0:0.1">
<DiscreteObjectKeyFrame Value="Thanks!
That felt great!!" />
</ObjectAnimationUsingKeyFrames>
</Storyboard>
</BeginStoryboard>
</EventTrigger.Actions>
</EventTrigger>
<EventTrigger RoutedEvent="CheckBox.Unchecked">
<EventTrigger.Actions>
<BeginStoryboard>
<Storyboard>
<ObjectAnimationUsingKeyFrames Duration="0:0:0.1"
Storyboard.TargetName="tb"
Storyboard.TargetProperty="Text">
<DiscreteObjectKeyFrame Value="Oh yeah!
I'm outta here!" />
</ObjectAnimationUsingKeyFrames>
<ObjectAnimationUsingKeyFrames Duration="0:0:0.1"
Storyboard.TargetProperty="IsHitTestVisible">
<DiscreteObjectKeyFrame>
<DiscreteObjectKeyFrame.Value>
<sys:Boolean>False</sys:Boolean>
</DiscreteObjectKeyFrame.Value>
</DiscreteObjectKeyFrame>
</ObjectAnimationUsingKeyFrames>
<DoubleAnimation Duration="0:0:0.5" To="0"
Storyboard.TargetProperty="Opacity"
BeginTime="0:0:2" />
</Storyboard>
</BeginStoryboard>
</EventTrigger.Actions>
</EventTrigger>
</Grid.Triggers>
<ToggleButton Width="100" Height="100">
<TextBlock x:Name="tb" Text="Toggle Me, Please!"
TextAlignment="Center" TextWrapping="Wrap" />
</ToggleButton>
</Grid>
Sidenote: This trick of using a discrete key frame animation to set a property value is actually a very useful thing to have in your arsenal… especially if you work a lot in Silverlight. Silverlight does not support property or data triggers. It does however support event triggers. As such, it is pretty common to use event triggers along with storyboards and discrete key frame animations in Silverlight to effectively set properties in response to events or visual state changes.
It’s worth noting that both property and data triggers can be used to launch actions too. You simply need to set the EnterActions (which execute when the trigger condition becomes true) and/or the ExitActions (which execute when the trigger condition becomes false). This is very handy for dealing with scenarios where there is no routed event off of which to trigger but there is a property. Here is a kaxample:
<StackPanel Orientation="Horizontal"
    xmlns="http://schemas.microsoft.com/winfx/2006/xaml/presentation"
    xmlns:x="http://schemas.microsoft.com/winfx/2006/xaml">
  <StackPanel.Resources>
    <Style TargetType="{x:Type TextBox}">
      <Setter Property="Template">
        <Setter.Value>
          <ControlTemplate TargetType="{x:Type TextBoxBase}">
            <Grid>
              <Rectangle Margin="1" Fill="#FFF" />
              <Rectangle Name="DisabledBackground" Margin="1"
                  Fill="#CCC" RenderTransformOrigin="1,0.5">
                <Rectangle.RenderTransform>
                  <ScaleTransform ScaleX="0" />
                </Rectangle.RenderTransform>
              </Rectangle>
              <Border Name="Border" CornerRadius="2" Padding="2"
                  BorderThickness="1" BorderBrush="#888">
                <ScrollViewer Margin="0" x:Name="PART_ContentHost" />
              </Border>
            </Grid>
            <ControlTemplate.Triggers>
              <Trigger Property="IsEnabled" Value="False">
                <Setter TargetName="Border" Property="BorderBrush" Value="#AAA"/>
                <Setter Property="Foreground" Value="#888"/>
                <Trigger.EnterActions>
                  <BeginStoryboard>
                    <Storyboard TargetName="DisabledBackground"
                        TargetProperty="RenderTransform.ScaleX">
                      <DoubleAnimation To="1" Duration="0:0:0.7"
                          DecelerationRatio="0.5" />
                    </Storyboard>
                  </BeginStoryboard>
                </Trigger.EnterActions>
                <Trigger.ExitActions>
                  <BeginStoryboard>
                    <Storyboard TargetName="DisabledBackground"
                        TargetProperty="RenderTransform.ScaleX">
                      <DoubleAnimation To="0" Duration="0:0:0.7"
                          DecelerationRatio="0.5" />
                    </Storyboard>
                  </BeginStoryboard>
                </Trigger.ExitActions>
              </Trigger>
            </ControlTemplate.Triggers>
          </ControlTemplate>
        </Setter.Value>
      </Setter>
    </Style>
  </StackPanel.Resources>
  <CheckBox Name="MyCheckBox" FontWeight="Bold" Margin="0,6,4,0"
      VerticalAlignment="Top" Content="Print To File:" />
  <TextBox VerticalAlignment="Top" Margin="0,3,0,0" Text="C:\MyFile.prn"
      Width="200" IsEnabled="{Binding IsChecked, ElementName=MyCheckBox}" />
</StackPanel>
In this example, when the TextBox becomes disabled, a dark background appears to slide shut over the control, letting the user know that they can no longer edit the control. When the control becomes enabled again, the dark background slides back out of the way. Since there is no event that fires on the TextBox when the control becomes disabled or enabled, we must instead leverage a property trigger’s EnterActions and ExitActions to begin the animations.
Windows Theme Files
Hopefully styles, templates, and triggers are starting to make a lot of sense. To really appreciate how this lookless model works, I would encourage you to spend some time looking at the styles and templates for the native WPF controls. All of the default control styles and templates are available in the theme files which ship as part of the Windows SDK or with Blend.
When installing the SDK, you must select the option to install the .NET Framework 3.0 Samples. Then you will be able to access the theme files by looking in the Core directory within the following archive: %ProgramFiles%\Microsoft SDKs\Windows\v6.0 \Samples\WPFSamples.zip. The theme files also ship with Blend in the following directory: “%ProgramFiles%\Microsoft Expression\Blend <version>\SystemThemes”.
If you have not installed the Windows SDK or Blend, you can still view the theme styles and templates using .NET Reflector with the BamlViewer Add-In. Simply reflect upon the theme assembly of your choice. For example, you could load the Aero theme assembly from “%ProgramFiles%\Reference Assemblies\Microsoft\Framework\v3.0\PresentationFramework.Aero”. Once loaded, select the assembly and then select “BAML Viewer” from the Tools menu.
It’s worth noting that Blend also includes a set of “Simple Styles”, which are basically reference samples of how you might style and template the most common framework controls. These styles tend to be much simpler (hence the name) than the actual theme styles. See “Working with simple styles” in the Blend help file for more details.
Templating an ItemsControl
This is an ItemsControl series, so I guess we should spend a little time examining the lookless nature of a few ItemsControl classes. The remainder of this article covers several different aspects of ItemsControl templates. As with the rest of this series, many of these concepts also apply to non-ItemsControl classes.
A Lookless Lesson Learned
There is a story I really like to tell when introducing the lookless control model to developers and designers…
The early WPF (well, Avalon) platform contained an ItemsControl that never actually made it into any released bits. It was called RadioButtonList. As you can probably guess from the name, this was simply a list of mutually exclusive options, each one selectable via a RadioButton control. At first blush, this probably sounds like a really useful control to have in the platform, right? That’s what we all thought too. In fact we used it all over the place in demos and POCs. Then someone pointed out that the platform already contained a control for selecting an item from a list of mutually exclusive options… namely, a single-select ListBox!
Doh! Clearly, if they were going to sell this lookless story, they needed to live by it, so soon thereafter, a breaking change email announced the removal of the RadioButtonList control. Each instance was replaced with a styled ListBox.
The moral of the story is that the lookless concept requires a little getting used to. Clearly, even the architects of this new control model struggled a bit with it in the early days.
For your convenience, below is a kaxample that demonstrates my typical RadioButtonList style. You will need to press F5 to execute this sample within kaxaml:
<Window Title="RadioButtonList Sample" Width="500" Height="180"
    xmlns="http://schemas.microsoft.com/winfx/2006/xaml/presentation"
    xmlns:x="http://schemas.microsoft.com/winfx/2006/xaml"
    xmlns:sys="clr-namespace:System;assembly=mscorlib"
    Topmost="{Binding SelectedItem, ElementName=TopmostSelector}"
    WindowStyle="{Binding SelectedItem, ElementName=WindowStyleSelector}">
  <Window.Resources>
    <ObjectDataProvider x:Key="WindowStyles" MethodName="GetValues"
        ObjectType="{x:Type sys:Enum}" >
      <ObjectDataProvider.MethodParameters>
        <x:Type TypeName="WindowStyle" />
      </ObjectDataProvider.MethodParameters>
    </ObjectDataProvider>
    <Style x:Key="RadioButtonList" TargetType="{x:Type ListBox}">
      <Setter Property="BorderBrush" Value="{x:Null}" />
      <Setter Property="BorderThickness" Value="0" />
      <Setter Property="Tag" Value="Vertical" />
      <Setter Property="ItemsPanel">
        <Setter.Value>
          <ItemsPanelTemplate>
            <StackPanel Orientation="{Binding Tag,
                RelativeSource={RelativeSource AncestorType={x:Type ListBox}}}" />
          </ItemsPanelTemplate>
        </Setter.Value>
      </Setter>
      <Setter Property="ItemContainerStyle">
        <Setter.Value>
          <Style TargetType="{x:Type ListBoxItem}">
            <Setter Property="Margin" Value="6,2" />
            <Setter Property="Template">
              <Setter.Value>
                <ControlTemplate TargetType="{x:Type ListBoxItem}">
                  <Border Background="Transparent">
                    <RadioButton Focusable="False"
                        IsHitTestVisible="False"
                        IsChecked="{TemplateBinding IsSelected}">
                      <ContentPresenter />
                    </RadioButton>
                  </Border>
                </ControlTemplate>
              </Setter.Value>
            </Setter>
          </Style>
        </Setter.Value>
      </Setter>
    </Style>
  </Window.Resources>
  <StackPanel Margin="10">
    <TextBlock FontWeight="Bold">Topmost:</TextBlock>
    <ListBox Name="TopmostSelector" SelectedIndex="1" Margin="10,0,0,20"
        Style="{StaticResource RadioButtonList}" Tag="Vertical">
      <sys:Boolean>True</sys:Boolean>
      <sys:Boolean>False</sys:Boolean>
    </ListBox>
    <TextBlock FontWeight="Bold">WindowStyle:</TextBlock>
    <ListBox Name="WindowStyleSelector" SelectedIndex="1" Margin="10,0,0,0"
        Style="{StaticResource RadioButtonList}" Tag="Horizontal"
        ItemsSource="{Binding Source={StaticResource WindowStyles}}" />
  </StackPanel>
</Window>
Notice that I leverage the Tag property on the ListBox and a property trigger to toggle between a vertical and horizontal layout for the radio buttons. This is merely for convenience. If you want a more readable solution, you can always declare your own attached property of type Orientation to trigger off of in the style.
The Many Faces of a ListBox
We’ve already seen that a ListBox can take on many different looks. There is the default look, as determined by the theme’s ListBox style and template. Then there is the look we just defined above for a list of radio buttons.
Just for fun, let’s review a few other styled ListBox examples. It should be clear by now that all of these different looks are enabled by this lookless control model which brings together the things covered in this article (styles, templates, and triggers) as well as several other concepts covered in previous articles, including item templates (‘D’ is for DataTemplate), container styles (‘I’ is for Item Container), and swappable items panels (‘P’ is for Panel).
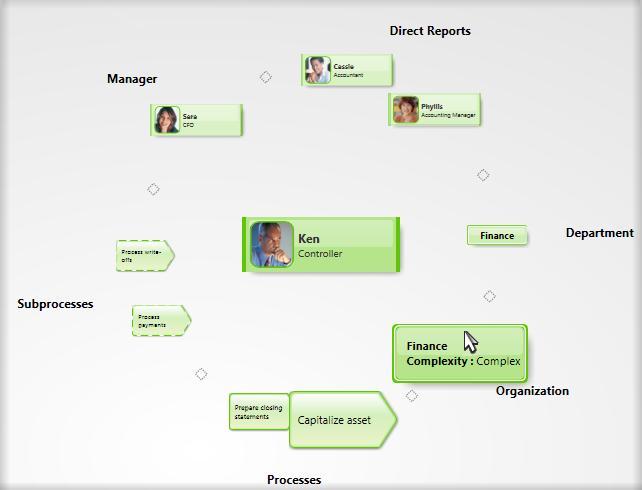
As we’ve done in the past, let’s borrow some images from the business modeling application used by the Microsoft Dynamics team. Here are a couple of more traditional styled ListBox examples, where the items are stacked vertically:
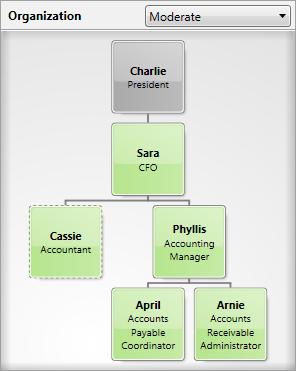
Naturally, that application also leverages a ListBox to present a list of radio buttons:

As described in ‘P’ is for Panel, the application uses a very slick custom panel within a ListBox to provide a pivot view for exploring entity relationships:
You may recall from the ICIQ Test (‘B’ is for Bet You Can’t Find Them All) that the application also contains a custom TreeGraph control. Technically, this control also qualifies as a ListBox (it derives from the ListBox class and then adds additional functionality to support custom item containers):
I guess while we’re on the topic of ListBox derivatives, it is worth noting that the native ListView control also derives from ListBox. So a ListView is actually a multi-columned ListBox:
Wow! Since the control, itself, is lookless, we could essentially go on forever coming up with new looks for a ListBox. We are limited only by our imaginations and styling skills!
Since we have this great power, it is worth also mentioning the great responsibility that comes with the lookless control model. In the end, the look and feel of our controls should be driven by the desire to create the best user experience possible for the scenario at hand. I’ve already seen too many videos playing inside rotating buttons. We must avoid the temptation to do things just because we can. (Hearken back to the early days of WYSIWYG word processors, where so many documents came out looking like ransom letters… ’nuff said! 😉 )
The Items Panel
There is one element that you will almost always find within the template of an ItemsControl. It is called an ItemsPresenter. In ‘P’ is for Panel, we learned that an ItemsPresenter reserves real estate within the control’s template for the items host (a.k.a., the items panel). By including this ItemsPresenter element within the control template and specifying the ItemsPanelTemplate separately, it is possible to have a swappable items panel without having to retemplate the entire ItemsControl. The ItemsPanelTemplate will be inflated within the ItemsPresenter to create a panel to host the items of the ItemsControl.
Of course, as we also learned in ‘P’ is for Panel, it is not absolutely necessary to include an ItemsPresenter in the control template. Another approach is to simply include a panel in the template and set its IsItemsHost property to true. The drawback here is that the items panel is no longer swappable via the ItemsPanelTemplate property. In fact, ItemsPanelTemplate is completely disregarded in this scenario.
The ToolBar control is an example of one such ItemsControl that uses a hard coded items panel. If you examine the control template for ToolBar, you will see an element called ToolBarPanel that has IsItemsHost set to true. This was an intentional design decision for ToolBar. The control template basically tells us that a ToolBar cannot function without a ToolBarPanel. (The reason for this requirement is that a ToolBar has special support for overflow items… if the items cannot fit within the space available in the ToolBarPanel, they are arranged within a ToolBarOverflowPanel in a Popup control.)
I think its fine to derive custom ItemsControl classes like ToolBar that have special dependencies on known template elements. As a control developer, there are certain measures that you should take whenever you decide to go this route. First, you need to fully document the requirements of your control. By requiring specific elements in the template, you are reducing the lookless nature of your control. Designers will need to be aware of these limitations when they re-template your control.
Other Known Parts
While we’re on this topic of required template elements, it’s worth noting that an ItemsControl will sometimes have dependencies on other elements besides just the items panel. Let’s consider the ComboBox control…
A ComboBox is a single-select ItemsControl whose full list of available items is usually presented in a “dropdown list” below a textual representation of the selected item. The template for a ComboBox consists of a TextBox and a Popup (as well as several other visual elements). As you might expect, the TextBox displays the selected item and the Popup contains the ItemsPresenter so it naturally presents the available items in the dropdown list.
The ComboBox class contains certain logic that is very specific to the Popup control. Again, any such dependency on a known template element (also referred to as a “template part”) reduces the looklessness of the control, but that’s okay as long as the requirement for the part is well documented.
This naturally raises a question as to how the ComboBox can accurately identify the known part (the Popup) within its template and hook it up to the control’s logic. One approach might be to walk the visual elements in the control’s template and look for an element of type Popup. Of course, this might fail if a designer decides to re-template the control in a way that involves two Popup elements.
To deal with ambiguities like this, the framework uses a specific naming convention for the identification of known template parts. That convention is to name the element using the prefix “PART_”. In the case of the ComboBox template, the expected name for the Popup is “PART_Popup”. So within the template, you will see a Popup element like this:
<Popup Name="PART_Popup" AllowsTransparency="True" Placement="Bottom">
  ...
</Popup>
Alright, we have a well-known name for the Popup. Next we need to use this name to locate the element. But when and how do we perform this lookup? It turns out that the framework provides a method for this very purpose. By overriding OnApplyTemplate(), a control can be notified when it’s template is inflated and loaded into the visual tree. The GetTemplateChild() method can then be used to look up a template element by name, as shown here:
public override void OnApplyTemplate()
{
    base.OnApplyTemplate();
    _popup = GetTemplateChild("PART_Popup") as Popup;
}
The use of known parts within a control template clearly adds complexity for design tools that need to support re-templating the control. As such, you may be wondering how the known template parts are made discoverable to tools like Blend and Cider. Well, the framework actually leverages a custom TemplatePart attribute to decorate control classes with known parts. For example, the ComboBox class is decorated with the following attributes:
[TemplatePart(Name="PART_EditableTextBox",Type=typeof(TextBox))]
[TemplatePart(Name="PART_Popup",Type=typeof(Popup))]
public class ComboBox : Selector
{
    ...
}
Note that although we’ve been looking at the ComboBox class in the above example, this convention of using known template parts is really applicable to all controls within the framework. Anytime a designer wishes to re-template a control, they should take some time to familiarize themself with the known parts. If they need to re-template a control for which they do not already have a sample template, they can leverage a tool like .NET Reflector to disassemble the control class and view the TemplatePart attributes.
Keeping It Loose
I’d like to offer some advice specifically for the authors of custom controls. A well-written, lookless control will provide what I refer to as a “loose” contract between the control and its template. This means that the control does not blow up (throw an exception) when elements are missing from its template. Rather, it knows how to degrade gracefully.
This loose contract approach is used for the native ItemsControl classes in WPF. For example, you can re-template a ListBox and simply leave out its ItemsPresenter. The ListBox class never assumes that an items panel is present. As such, when you use your template, you will note that your app runs fine. Of course, no items are displayed within the ListBox because there is no items panel in which to present them. The important thing is that no exceptions are thrown either.
The same graceful scale back can be seen in the ComboBox control when you leave out a known template part like “PART_Popup”. The ComboBox class never assumes that a Popup is present. Instead, the class always checks its internal Popup reference to make sure its non-null prior to accessing it.
Testing your control against templates with missing elements is part of supporting a truly lookless control model. Users of your control will really appreciate your diligence in this matter because it means their designers will have full freedom to re- template the control as they see fit.
To Derive or Not To Derive
We’ve already seen that the lookless model provides the opportunity to reuse a single control class with many different visual representations. There will certainly be times when you need more than just a new look and feel. If a class does not provide all the functionality you need, you may actually need to derive a new control by extending an existing class.
The ListView control is a good example of an ItemsControl which has been thusly extended. The ListView class derives from ListBox and adds support for a broader concept of “Views”. (We won’t go into whether ListView is a well-contrived control… that is a much bigger conversation and this post is already too long!)
The most common view used within a ListView is called a GridView. This view allows each item to be presented as a row within a grid (or table). The columns in the grid each have their own header. In simple scenarios, a ListView can be used as a lightweight data grid (which was important in the initial release of the platform because there was no native DataGrid class). You can see the ListView class in action in ‘R’ is for Rob has a Customer.
Extending functionality is just one reason you might choose to derive a new control. Another reason might be that the existing control is not entirely lookless. In this case, you may wish to derive a new class and override specific functionality within the base class.
Consider the TreeView class. In ‘B’ is for Bet You Can’t Find Them All, we saw an example of a TreeView that had been re-templated to support a horizontal layout. This telescoping TreeView is displayed in the following image:
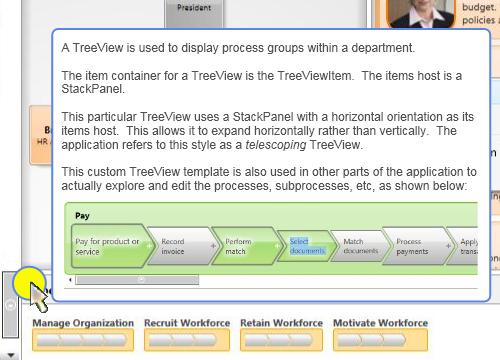
It turns out that creating this custom TreeView was not as simple as merely re-templating the TreeView class. The item container class, TreeViewItem, contains hardcoded support for keyboard navigation that assumes the tree expands vertically. (Pressing the Left and Right arrow keys on a TreeViewItem expands or collapses a branch in the tree, whereas pressing the Up and Down arrows navigates between nodes in the tree.) In order to create a horizontally expanding TreeView, it was necessary to swap the directional navigation keys. This required the derivation of a new TelescopingTreeView class from the native TreeView class as well as the derivation of a new TelescopingTreeViewItem class from the native TreeViewItem class.
Hopefully this can be a lesson to us all. Clearly, this TelescopingTreeView required a lot more work than would have been necessary if a truly lookless base class existed. It would have been nice if the native TreeViewItem added support for keyboard navigation via attached key bindings rather than hardcoded keyboard behaviors. (Note to self: Do a post on attached key bindings someday.) I certainly try to keep things like this in mind whenever I’m overriding specific input methods like OnKeyDown().
Coming Up Next
Congratulations! You made it through the longest post in this series (thus far :P). More importantly, you are now familiar with the lookless control model and the techniques for defining the look and feel of controls within this model. In the next post, ‘N’ is for Natural User Interface, we will learn that an infinite loop is not always a bad thing!